sourdough

Sourdough Challah Benefits and Recipe

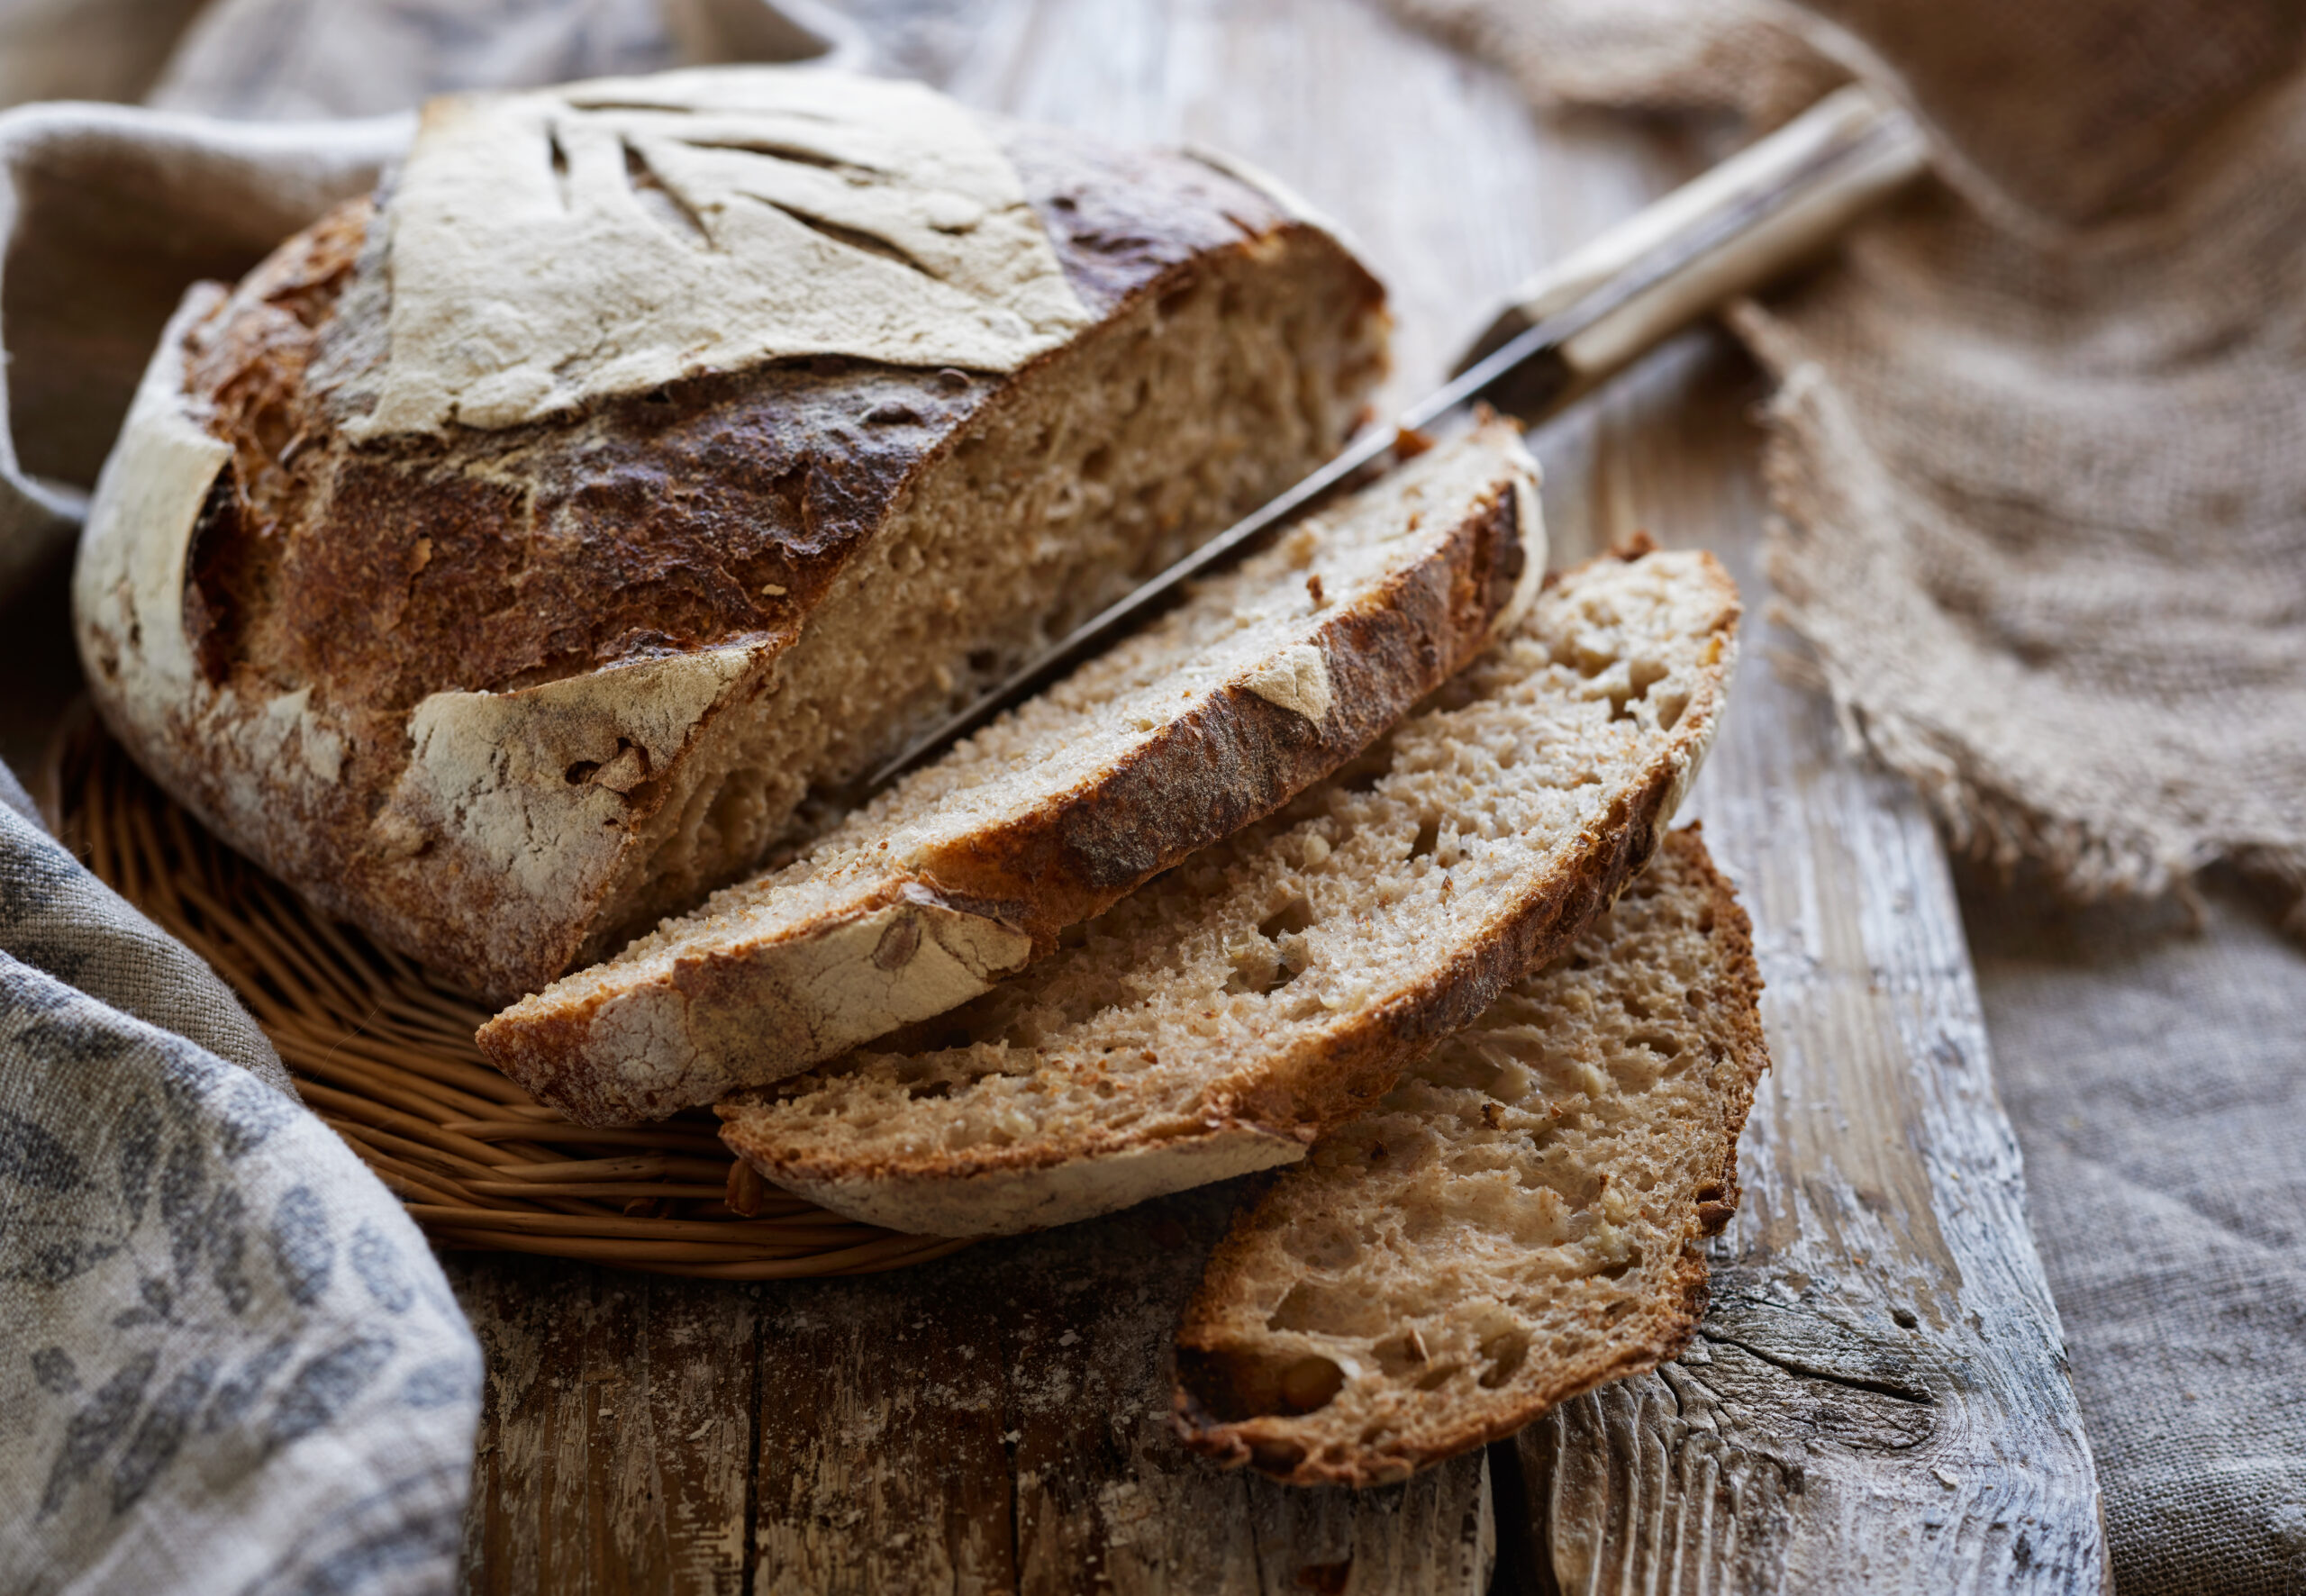
Introduction: Sourdough bread has gained immense popularity for its tangy flavor, chewy texture, and numerous health benefits. If you’re a fan of sourdough and are looking to elevate your baking game, Spice & Zest Premium Sourdough Starter is the perfect choice. In this blog post, we’ll guide you through using this exceptional starter and provide you with a delightful recipe to bake sourdough challah.

Some Key Benefits of Sourdough Challah:

  1. Enhanced Digestibility: Sourdough bread, including sourdough challah, undergoes a fermentation process that breaks down gluten and other complex carbohydrates. This makes it easier to digest for individuals with gluten sensitivity or intolerance.
  2. Improved Nutritional Profile: Sourdough bread is rich in nutrients like B vitamins, iron, and minerals due to the fermentation process. The use of Spice & Zest Premium Sourdough Starter enhances the nutritional benefits of your homemade sourdough challah.
  3. Healthier Bread Option: Unlike commercially produced bread that often contains additives and preservatives, baking your own sourdough challah allows you to have full control over the ingredients. This means you can avoid artificial additives and choose high-quality, organic ingredients for a healthier bread option.
  4. Unique Flavor and Aroma: Sourdough challah has a distinct tangy flavor and aroma that comes from the natural fermentation process.
  5. Longer Shelf Life: Sourdough bread has a longer shelf life compared to regular bread due to the acidity created during fermentation. This means your sourdough challah can stay fresh for a longer period, allowing you to enjoy it over several days.
  6. Artisanal and Homemade: Baking sourdough challah allows you to create a homemade, artisanal bread that is sure to impress your family and friends. The process of creating and shaping the challah is a rewarding and satisfying experience.
  7. Versatility: Sourdough challah is a versatile bread that can be enjoyed in various ways. Use it for sandwiches, toast, French toast, or simply enjoy it on its own with butter or your favorite spreads.

How To Activate Dried Sourdough Starter?

Part 1: Using Spice & Zest Premium Sourdough Starter Before you begin, make sure you have the following ingredients and equipment:

  • Spice & Zest Premium Sourdough Starter
  • Bread flour White and Whole Wheat Flour
  • Water
  • Glass Jar or bowl
  • Jar cover or plastic wrap or kitchen towel
  • Kitchen scale
  • Dough scraper
  • Baking parchment paper
  • Baking sheet or loaf pan

Step 1: Activating the Sourdough Starter

  1. Take your Spice & Zest Premium Sourdough Starter out of the refrigerator and let it come to room temperature.
  2. In a large mixing bowl, open the small pack of Spice & Zest starter full pack of sourdough starter with 32 grams of white flour and 8 grams of wholewheat flour and 40 grams of water.
  3. Stir the mixture until well combined, cover the jar or bowl with cove or plastic wrap or a kitchen towel, and let it sit at room temperature for 12 hours.

Step 2: Building the Levain

  1. Remove most of the sourdough from jar or bowl, just leave in jar about 1 tablespoon of active starter and repeat the same process activated sourdough starter with 40 grams of flour and 40 grams of water.
  2. Mix well until all the ingredients are fully incorporated.
  3. Cover the jar or bowl again and let it ferment at room temperature for 2-3 days. The levain should become puffy and doubled in size.

Part 2: Sourdough Challah Recipe Now that your sourdough starter is activated and the levain is ready, let’s move on to the sourdough challah recipe.

Ingredients:

  • 450 grams white wheat bread flour
  • 50 grams whole wheat flour
  • 100 g Active sourdough starter (bubbly sourdough starter)
  • 10 grams salt
  • 375 g Warm water (350 for initial dough+25 for when adding salt)
  • Egg wash (1 egg mixed with a tablespoon of water)

Instructions

  • Feed your starter 6-8 hours before baking.

Preparing the dough

  • In a large bowl, combine 100g leaven and 350g of water and mix well.
  • Add the whole wheat and bread flours and mix until well incorporated.

Autolyse

  • Cover the bowl and leave it to rest for 30-60 minutes. This step allows the gluten to develop without the interruption of salt.
  • After 30-60 min of rest, add 25 g of water and 10g salt, and knead until the salt and water are combined into dough.

Step 2: First Rise

  • Cover and set the bowl in a warm area (75-80 degrees) for 3 to 4 hours or for 6-8 hours in a cooler place (during the winter season, you can put it in a turned-off oven with a hot pan of water, or next to the stovetop near a pot of simmering water).
  • During the bulk rise, perform stretch and folds every 30-60 minutes. Stretching and folding the dough allows the gluten to strengthen and develop without harsh kneading, which would knock out the gas bubbles that develop during fermentation. Towards the last hour of the bulk ferment, fold the dough more gently to avoid pressing gas out of the dough.
  • Bench Rest
  • Scoopt the dough onto the countertop.
  • Lightly flour the top of the dough. Very gently turn over the dough so the floured side is face down, and fold the dough on all 4 ends, gently shaping it into a round boule.
  • Leave the dough to rest for 20 minutes. The edges should be round and thick (it’s ok if it flattens a little) but they should not taper off. If they do taper or flatten off, reshape and let sit for another 20 minutes (this is like doing another set of folds during the bulk rise).

Step 3: Shaping the Challah

  1. Shaping
  2. Sprinkle a towel lined bowl or a banneton with a 50/50 blend of rice and white flours.
  3. Fold the bottom third up, right side one third over, left side third over, top third over and then roll the entire loaf over and gently pull toward you, using tension to form the loaf. Place in the prepared, flour dusted bowl.
  4. Let rise for 3 to 4 hours at room temp or place in refrigerator for up to 12 hours (this is known as ‘retarding the dough’- it slows down the rising process while allowing deeper flavor to develop).

Baking

  • Place your Dutch oven in the oven and preheat the oven to 500°F.
  • Gently place the dough into the Dutch oven and score the top of the bread.
  • Bake at 500°F, covered, for 20 minutes.
  • Remove lid, lower temperature to 450° and continue to bake for an additional 20 – 30 minutes until crust is a rich, dark amber color and sounds hollow when you knock it.
  • Let it cool on a wire rack before slicing.

Step 7: Cooling and Enjoying

  1. Remove the baked challah from the oven and let it cool on a wire rack for at least 30 minutes before slicing.
  2. Once cooled, slice and serve your delicious sourdough challah as desired. It’s perfect for sandwiches, toasting, or enjoying on its own!

Conclusion: Using Spice & Zest Premium Sourdough Starter provides an excellent foundation for baking flavorful and nutritious sourdough bread. By following the steps outlined above, you can easily activate the starter and create a delectable sourdough challah. Experiment with different variations, such as adding seeds or dried fruits, to customize your challah according to your preferences. Enjoy the process and the delightful aroma of freshly baked sourdough challah in your kitchen!

acai

The Best Recipe for Acai Bowls and Its’ Health Benefits

Introduction: Acai bowls have gained immense popularity in recent years for their delicious taste and numerous health benefits. These vibrant and refreshing bowls are made with acai berries, which are packed with antioxidants and essential nutrients. In this blog, we will share the best recipe for an acai bowl and delve into the many benefits of incorporating this superfood into your diet.

The Recipe: Ingredients:

  • 2 packs of frozen acai berry puree (unsweetened)
  • 1 ripe banana
  • 1/2 cup of frozen mixed berries (blueberries, strawberries, raspberries)
  • 1/2 cup of almond milk (or any milk of your choice)
  • 1 tablespoon of honey or maple syrup (optional)
  • Toppings: sliced fresh fruits (bananas, berries, mangoes), granola, shredded coconut, chia seeds, and a drizzle of nut butter

Instructions:

  1. Break the frozen acai berry puree into small chunks.
  2. In a blender, add the acai chunks, ripe banana, frozen mixed berries, almond milk, and sweetener if desired.
  3. Blend on high speed until smooth and creamy. You may need to stop and scrape down the sides of the blender to ensure all the ingredients are well incorporated.
  4. Pour the acai mixture into a bowl.
  5. Top with your favorite toppings, such as fresh fruit slices, granola, shredded coconut, chia seeds, and a drizzle of nut butter.
  6. Serve immediately and enjoy!

Health Benefits of Acai Bowls:

  1. Rich in Antioxidants: Acai berries are known for their exceptional antioxidant content. Antioxidants help combat oxidative stress and reduce inflammation in the body, which can contribute to chronic diseases. The high levels of anthocyanins, a type of antioxidant, in acai berries give them their deep purple color and provide powerful health benefits.
  2. Supports Heart Health: Acai berries are heart-healthy due to their high content of monounsaturated fats, fiber, and plant sterols. These components can help lower cholesterol levels, reduce the risk of heart disease, and improve overall cardiovascular health.
  3. Boosts Immune System: The antioxidants, vitamins, and minerals in acai berries help strengthen the immune system, protecting the body against infections and diseases. Acai bowls can be a tasty way to fortify your immune system and support overall well-being.
  4. Enhances Digestive Health: The fiber content in acai berries aids digestion and promotes a healthy gut. It helps prevent constipation, supports regular bowel movements, and contributes to a balanced and thriving gut microbiome.
  5. Provides Energy and Satiety: Acai bowls are a great source of natural energy due to their carbohydrate content. The combination of complex carbohydrates, healthy fats, and protein in the toppings and added ingredients helps provide sustained energy levels and keeps you feeling full and satisfied.
  6. Supports Skin Health: The antioxidants in acai berries help protect the skin from damage caused by free radicals, which can contribute to premature aging and skin conditions. Consuming acai bowls can contribute to a healthy, radiant complexion.

Conclusion: Acai bowls offer a delightful and nutritious way to start your day or enjoy as a refreshing snack. With their antioxidant-rich nature and numerous health benefits, they are a fantastic addition to a well-balanced diet. By incorporating this best recipe for an acai bowl into your routine, you can savor the delicious taste while reaping the rewards of improved heart health, boosted immune system, enhanced digestion, increased energy, and radiant skin. Embrace the goodness of acai berries and enjoy the many benefits of this superfood in a bowl!

2-protein-bars

Homemade High-Protein Bars: Fuel Your Active Lifestyle with Delicious DIY Snacks

Introduction: When it comes to maintaining an active lifestyle, having nutritious and convenient snacks on hand is essential. Commercial protein bars can be expensive and often contain additives or high levels of added sugars. Why not take matters into your own hands and bake your own high-protein bars? Not only will you have control over the ingredients, but you’ll also be able to customize them to suit your taste preferences. In this blog, we’ll guide you through an easy and delicious recipe for homemade high-protein bars that will keep you energized and satisfied throughout the day.

  1. The Power of Protein: Protein is the building block of muscles and plays a vital role in muscle recovery and growth. By making your own high-protein bars, you can ensure an adequate protein intake to support your active lifestyle. Choose a protein powder that aligns with your dietary preferences and goals, such as whey, soy, or plant-based options like pea or hemp protein.
  2. Gather Your Ingredients: To create your homemade high-protein bars, you’ll need a combination of protein powder, rolled oats, nut butter, honey or maple syrup, milk, nuts, dried fruit, dark chocolate chips, vanilla extract, cinnamon, and salt. These ingredients will provide a balance of protein, healthy fats, complex carbohydrates, and natural sweetness.
  3. Mix and Customize: In a large mixing bowl, combine the dry ingredients such as rolled oats, protein powder, nuts, dried fruit, dark chocolate chips, cinnamon, and salt. Then, in a separate bowl, heat and mix the wet ingredients consisting of nut butter, honey/maple syrup, milk, and vanilla extract. Pour the wet mixture into the dry ingredients and mix until well combined. Feel free to add your favorite mix-ins like shredded coconut, seeds, or spices to personalize the bars.
  4. Bake and Let Cool: Transfer the mixture into a lined baking dish or pan, pressing it down firmly and evenly. Bake in a preheated oven until golden brown around the edges. Once baked, allow the bars to cool completely in the pan before cutting them into individual bars or squares. This step ensures that they maintain their shape and texture.
  5. Storage and Enjoyment: Store your homemade high-protein bars in an airtight container or individually wrap them for convenience. They can be kept at room temperature for a few days or refrigerated for longer shelf life. Grab one whenever you need a quick and nourishing snack to fuel your active lifestyle.

Conclusion: By preparing your own homemade high-protein bars, you take control of your nutrition and snack choices. These DIY snacks offer a balance of protein, healthy fats, and carbohydrates, making them ideal for refueling and recovering after workouts or as a convenient on-the-go option. Experiment with different protein flavors, mix-ins, and textures to discover your favorite combinations. Say goodbye to store-bought protein bars and say hello to delicious, customized, and nutritious treats that support your active lifestyle.

Here’s a recipe for homemade high-protein bars that you can bake:

Ingredients:

  • 1 cup rolled oats
  • 1 cup protein powder (your choice of flavor)
  • 1/2 cup nut butter (such as almond butter or peanut butter)
  • 1/4 cup honey or maple syrup
  • 1/4 cup milk (dairy or plant-based)
  • 1/4 cup chopped nuts (such as almonds, walnuts, or cashews)
  • 1/4 cup dried fruit (such as raisins, cranberries, or chopped dates)
  • 1/4 cup dark chocolate chips (optional)
  • 1 teaspoon vanilla extract
  • 1/2 teaspoon cinnamon (optional)
  • Pinch of salt

Instructions:

  1. Preheat your oven to 350°F (175°C) and line a baking dish or pan with parchment paper.
  2. In a large mixing bowl, combine the rolled oats, protein powder, chopped nuts, dried fruit, dark chocolate chips, cinnamon (if using), and salt. Mix well to ensure even distribution of ingredients.
  3. In a separate microwave-safe bowl, heat the nut butter and honey/maple syrup together for about 30 seconds until they become slightly runny. Stir in the milk and vanilla extract.
  4. Pour the wet mixture into the dry ingredients and mix thoroughly until everything is well combined. The mixture should be sticky and hold together when pressed.
  5. Transfer the mixture into the lined baking dish or pan. Press it down firmly and evenly using the back of a spoon or your hands.
  6. Bake in the preheated oven for approximately 15-20 minutes or until the edges turn golden brown.
  7. Remove from the oven and let it cool completely in the pan before cutting into bars or squares.
  8. Once cooled, store the protein bars in an airtight container or individually wrap them for convenience.

Feel free to customize this recipe by adding additional ingredients like seeds (chia, flax, or sunflower), shredded coconut, or spices (such as nutmeg or cardamom) to suit your taste preferences.

These homemade high-protein bars are perfect for a quick and nutritious snack on the go or as a post-workout treat. Make a batch in advance and enjoy the benefits of a wholesome, protein-packed snack that you can easily incorporate into your active lifestyle.